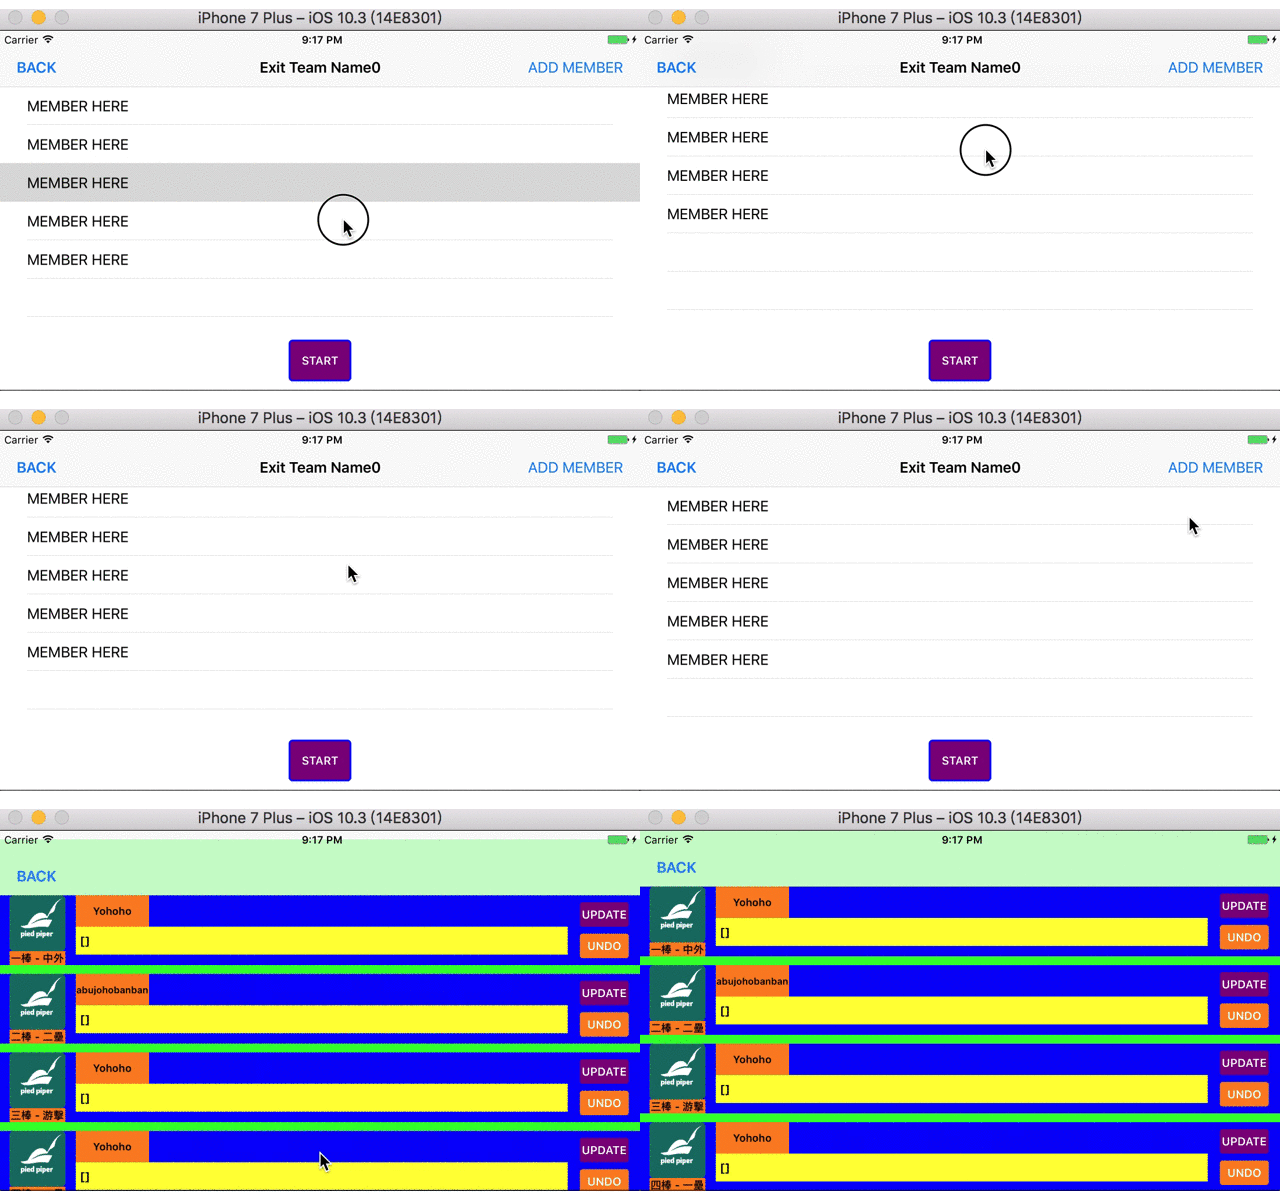
接續前兩天做的隊伍成員畫面SetNewTeamController
當時在實作時直接將整個畫面都用TableView製作
但是幾經思考,我覺得需要多一個按鈕在這個頁面上
使用者應該是經由這個按鈕來確認進入紀錄畫面
而非使用navigationItem的rightItem
為此,我認為用一個UIViewController當主體
在上面再另外新增一個TableView是比較好的做法
首先一樣先看看完工的模樣

最底層是一個UIView,上面放一個tableView跟一個button作為subView
就來看看在程式碼內如何做出這樣的效果吧
1
2
3
4
5
6
7
8
9
10
11
12
13
14
15
16
17
18
19
20
21
22
23
24
25
26
27
28
29
30
31
32
33
34
35
36
37
38
39
40
41
42
43
44
45
46
47
48
49
50
51
52
53
54
55
56
57
58
59
60
61
62
63
64
65
66
67
68
69
70
71
72
73
74
75
76
77
78
79
80
81
82
83
84
85
86
| import UIKit
class SetNewTeamController: UIViewController, UITableViewDelegate, UITableViewDataSource {
let cellId = "cellId"
var teamTitle: String?
private var tableView: UITableView!
override var prefersStatusBarHidden: Bool {
return false
}
lazy var startButton: UIButton = {
let button = UIButton()
button.translatesAutoresizingMaskIntoConstraints = false
button.backgroundColor = .purple
button.layer.cornerRadius = 5
button.layer.borderColor = UIColor.blue.cgColor
button.layer.borderWidth = 2
button.setTitle("START", for: .normal)
button.titleLabel?.font = UIFont.boldSystemFont(ofSize: 13)
button.addTarget(self, action: #selector(toRecordController), for: .touchUpInside)
return button
}()
override func viewDidLoad() {
super.viewDidLoad()
view.backgroundColor = .white
let backButton = UIBarButtonItem(title: "BACK", style: .done, target: self, action: #selector(backHome))
let addButton = UIBarButtonItem(title: "ADD MEMBER", style: .plain, target: self, action: #selector(toAddMemberController))
navigationItem.title = teamTitle
navigationItem.leftBarButtonItem = backButton
navigationItem.rightBarButtonItem = addButton
tableView = UITableView()
tableView.register(UITableViewCell.self, forCellReuseIdentifier: cellId)
tableView.translatesAutoresizingMaskIntoConstraints = false
tableView.dataSource = self
tableView.delegate = self
view.addSubview(tableView)
view.addSubview(startButton)
tableView.topAnchor.constraint(equalTo: view.topAnchor).isActive = true
tableView.rightAnchor.constraint(equalTo: view.rightAnchor).isActive = true
tableView.leftAnchor.constraint(equalTo: view.leftAnchor).isActive = true
tableView.bottomAnchor.constraint(equalTo: view.bottomAnchor, constant: -72).isActive = true
startButton.topAnchor.constraint(equalTo: tableView.bottomAnchor, constant: 12).isActive = true
startButton.centerXAnchor.constraint(equalTo: view.centerXAnchor).isActive = true
startButton.widthAnchor.constraint(equalToConstant: 72).isActive = true
startButton.heightAnchor.constraint(equalToConstant: 48).isActive = true
}
func backHome() {
self.dismiss(animated: true, completion: nil)
}
func toAddMemberController() {
let controller = AddMemberController()
present(UINavigationController(rootViewController: controller), animated: true, completion: nil)
}
func toRecordController() {
let controller = RecordController(collectionViewLayout: UICollectionViewFlowLayout())
present(UINavigationController(rootViewController: controller), animated: true, completion: nil)
}
func numberOfSections(in tableView: UITableView) -> Int {
return 1
}
func tableView(_ tableView: UITableView, numberOfRowsInSection section: Int) -> Int {
return 5
}
func tableView(_ tableView: UITableView, cellForRowAt indexPath: IndexPath) -> UITableViewCell {
let cell = UITableViewCell(style: UITableViewCellStyle.value1, reuseIdentifier: cellId)
cell.textLabel?.text = "MEMBER HERE"
return cell
}
}
|
首先就是把原本是UITableViewController子類別的SetNewTeamController修改一下
如同前面所提到的,我們需要一個UIViewController跟一個UITableView
因此繼承UIViewController, UITableViewDelegate, UITableViewDataSource這三個類別
然後宣告一個變數tableView
在viewDidLoad裡面(36~40)實作、註冊、設定delegate跟datasource
然後將tableView作為UIView的subView加入畫面
最後設定anchor(45~48)來決定tableView的大小
在這裡讓tableView上方跟左右對齊整個畫面
下方則向上縮72Point,以留一部分空間放置新增的button
後面一樣實作numberOfSections、numberOfRowsInSection跟cellForRowAt
接下來就是新增一個按鈕一樣新增到畫面上
然後可以看到在navigationItem的rightItem我將動作從toRecordController換成了toAddMemberController
這就是下一篇要製作來新增隊伍成員的畫面.
